In this post, we learn how to use angular material in angular 7. we start with scratch step by step.
.Angular Materials is a UI component for the Angular JS framework. Angular Material help to create attractive, consistent, and functional web pages and also help to create modern web design principles like lightweight, device independence.
Step:1 Create a new Angular 7 application
To create a new fresh angular project run this following command. Here we also install routing and style package.
ng new material-ng --routing --style=scssStep: 2 Install Angular Material and Dependencies
After a successful install, a new project now, install Angular Material and some other dependencies like animation and _________ using
Step:1 Install Angular /material
npm i --save @angular/material @angular/cdkStep:2 Install Angular Animation
npm i --save @angular/animationsStep:3 Install Hammer JS
npm i --save hammerjsStep: 3 Import files
Import some files.
src/main.ts
import { enableProdMode } from '@angular/core';
import { platformBrowserDynamic } from '@angular/platform-browser-dynamic';

import { AppModule } from './app/app.module';
import { environment } from './environments/environment';

// import hammer file
import 'hammerjs';

if (environment.production) {
  enableProdMode();
}

platformBrowserDynamic().bootstrapModule(AppModule)
  .catch(err => console.error(err));
And also import the browser animation module. and also add in imports array.
import { BrowserModule } from '@angular/platform-browser';
import { NgModule } from '@angular/core';

import { AppRoutingModule } from './app-routing.module';
import { AppComponent } from './app.component';
import { BrowserAnimationsModule } from '@angular/platform-browser/animations';
@NgModule({
  declarations: [
    AppComponent
  ],
  imports: [
    BrowserModule,
    AppRoutingModule,
    BrowserAnimationsModule
  ],
  providers: [],
  bootstrap: [AppComponent]
})
export class AppModule { }
Step: 4 Create a typescript file
Now, time to create a simple typescript file in src/app/material.ts
material.ts
import { MatButtonModule, MatCheckboxModule } from '@angular/material';
import { NgModule } from '@angular/core';


@NgModule({
  imports: [ MatButtonModule, MatCheckboxModule ],
  exports: [ MatButtonModule, MatCheckboxModule ]
})

export class MaterialModule {

}
Here we add two modules Button and Checkbox module, add into then import and export and export a class MaterialModule. if we wanna add more component of angular Material we can it’s at first line in the material.ts.
Now import this MaterialModule into app.module.ts
app.module.ts
import { BrowserModule } from '@angular/platform-browser';
import { NgModule } from '@angular/core';

import { AppRoutingModule } from './app-routing.module';
import { AppComponent } from './app.component';
import { BrowserAnimationsModule } from '@angular/platform-browser/animations';

// import this new file
import { MaterialModule } from './material';

@NgModule({
  declarations: [
    AppComponent
  ],
  imports: [
    BrowserModule,
    AppRoutingModule,
    BrowserAnimationsModule,
    MaterialModule
  ],
  providers: [],
  bootstrap: [AppComponent]
})
export class AppModule { }
Step:5 Include a theme
Angular Material provides us with four themes.
deeppurple-amber.cssindigo-pink.csspink-bluegrey.csspurple-green.css
Choose one theme and include into style.scss
@import '@angular/material/prebuilt-themes/deeppurple-amber.css';Step:6 Now add a button component
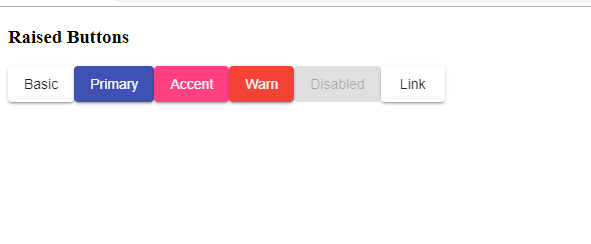
Now, all setup is completed we can use a button and checkbox component. if you want more add then into material.ts.
app.component.html
<h3>Raised Buttons</h3>
<div >
 <button mat-raised-button>Basic</button>
 <button mat-raised-button color="primary">Primary</button>
 <button mat-raised-button color="accent">Accent</button>
 <button mat-raised-button color="warn">Warn</button>
 <button mat-raised-button disabled>Disabled</button>
 <a mat-raised-button routerLink=".">Link</a>
</div>
<router-outlet></router-outlet>
Now, go to this link. and see the application.
So, finally, we completed tutorial How to Use Angular Material in Angular 7.
Conclusion:
We install a new Angular 7 project and install the Angular Material package and their dependencies. We use the button and checkbox component of Angular Material.

Brijpal Sharma is a web developer with a passion for writing tech tutorials. Learn JavaScript and other web development technology.